
Build a virtual cat that lives on a Raspberry Pi e-paper display, responds to the Pi’s health and accepts care from an optional round ESP32 touchscreen remote.

Pi Meowagotchi is one build split across two open-source repositories. pi-meowagotchi runs the pet and e-paper display. pi-meowagotchi-controls turns a DFRobot round ESP32-S3 display into its physical remote.
What you will build
| Part | Role |
|---|---|
| Raspberry Pi and e-paper panel | Runs the simulation, stores the cat, reads Pi vitals and renders the display. |
| Private Meow Meow Scratch app | Shares state and configuration and carries pending care actions between devices. |
| ESP32-S3 round touchscreen | Queues feed, play, pet, clean, nap and wake requests. It does not store pet state. |
The Pi is always the authority. A tap on the remote creates a pending action, the Pi applies it once, then marks it accepted or rejected. This avoids two devices trying to maintain competing versions of the same pet.
ESP32 touchscreen
       |
       | queues a private care action
       v
Meow Meow Scratch actions endpoint
       |
       | polled and acknowledged
       v
Raspberry Pi ----> pet state ----> e-paper displayCode language: PHP (php)
What you need
For the e-paper cat
- A Raspberry Pi Zero 2 W with pre-soldered headers, or another compatible Pi with network access and SPI support
- A supported Waveshare e-paper HAT or panel
- Raspberry Pi OS with Python 3.11 or newer
- A suitable power supply and storage for the Pi
The project was developed and tested on a Pi Zero 2 W running Debian 13 (Trixie) with a Waveshare 2.13-inch V4 250×122 panel. The renderer scales to the dimensions reported by other panel modules in the waveshare-epaper bundle, but you must select the driver that matches your exact panel revision.
For the touchscreen remote
- A DFRobot DFR1221 ESP32-S3R8 round display
- A USB-C data cable
- A Wi-Fi network the board can join
- Optional: an external I2C LIS3DH accelerometer for shake-to-play
The linked catalogue pages are compatibility-oriented retailer links. Reuse suitable hardware you already own. Prices, availability and package contents can change, so check each retailer listing before ordering.
Core project hardware
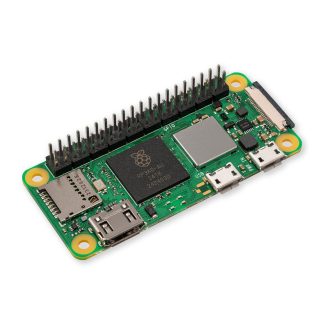
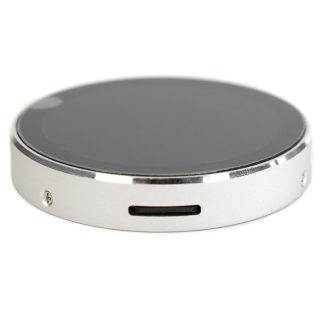
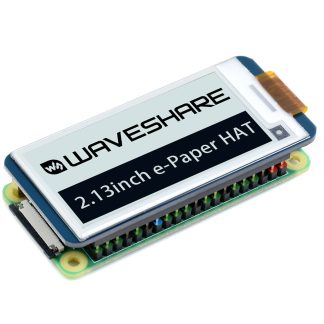
The DFR1221 does not include an accelerometer. Touch controls work without one. If you enable shake tracking, you must add and wire the LIS3DH separately.
1. Install the cat on the Raspberry Pi
Enable SPI in raspi-config → Interface Options → SPI, then reboot. Confirm that Linux created the SPI devices:
ls /dev/spidev*Clone and install the Raspberry Pi half of the project:
git clone https://github.com/meowmeowscratch/pi-meowagotchi.git
cd pi-meowagotchi
./install.shCode language: PHP (php)
The installer creates /opt/meowagotchi, installs a systemd service and adds the meowagotchi command. You may leave the Meow app key blank for this first local test.
If your panel is not the Waveshare 2.13-inch V4, run meowagotchi panels and set the matching panel value in /opt/meowagotchi/config.toml. There is no reliable automatic revision detection. Setting the wrong driver can prevent the display from working.
2. Verify local care and display output
systemctl status meowagotchi
meowagotchi status
meowagotchi feed
meowagotchi pet
The status command should report the cat’s needs, health and mood. Care commands are safe while the display service is running. Commands that drive the panel directly are different: stop the service before using once or clear, because two processes must not compete for the SPI bus.
If you want to inspect the display without hardware, the repository also provides meowagotchi preview, which renders the room to a PNG on a workstation.
3. Connect the private backend
The cat can remain local indefinitely. The backend becomes necessary when you add the touchscreen, because it carries the remote’s care requests to the Pi.
From a checkout of pi-meowagotchi on a machine with Python 3.11 or newer, install the optional Meow dependencies and run the idempotent provisioning script:
python3 -m pip install -e ".[meow]"
export MEOW_PLATFORM_API_KEY="YOUR_PLATFORM_TOKEN"
export MEOW_USERNAME="YOUR_USERNAME"
python3 scripts/init_app.pyCode language: JavaScript (javascript)
This creates a private meowagotchi app with state and config static endpoints plus an actions collection. Use the platform token only for provisioning. Create or select an app-scoped key with read/write access to this app for both devices.
Put the app key and account name in the Pi’s protected environment file:
sudoedit /opt/meowagotchi/.env

# Add:
MEOW_APP_API_KEY="YOUR_APP_KEY"
MEOW_USERNAME="YOUR_USERNAME"

sudo systemctl restart meowagotchiCode language: PHP (php)
After the restart, local state remains available as an offline cache. The Pi also polls for remote configuration and pending actions.
4. Prepare the round touchscreen
Clone the controller repository on the workstation you will use to flash the board:
git clone https://github.com/meowmeowscratch/pi-meowagotchi-controls.git
cd pi-meowagotchi-controlsCode language: PHP (php)
The board needs DFRobot’s DFR1221-specific MicroPython firmware. A stock ESP32_GENERIC_S3 build does not include the required LVGL display and touch driver. Follow the controller repository’s current DFR1221 setup guide for the complete flashing procedure.
On Debian or Ubuntu, extract the retained DFRobot package, put the board into bootloader mode, identify its serial port and run the repository’s flashing helper:
sudo apt install unrar
./tools/setup_dfr1221_vendor.sh

ls /dev/ttyACM* /dev/ttyUSB* 2>/dev/null

DFR1221_FIRMWARE=vendor/dfrobot/dfr1221-micropython/Micropython/firmware/micropython_firmware.bin \
  ./tools/flash_dfr1221.sh /dev/ttyACM0 --yesCode language: JavaScript (javascript)
Flashing replaces the board’s factory firmware. Verify the port and board before continuing, then press RESET or reconnect USB when the flash completes.
5. Configure and deploy the remote
Create .env in the controller repository. It is ignored by Git and is converted to a device-only settings.py during deployment:
WIFI_NAME="YOUR_WIFI_NAME"
WIFI_PASS="YOUR_WIFI_PASSWORD"
MEOW_APP_API_KEY="YOUR_APP_KEY"Code language: JavaScript (javascript)
Use the same app-scoped key as the Pi. Never put the platform token on the controller: the remote needs permission to send care requests, not to create or reshape apps.
python3 -m venv .venv
.venv/bin/python -m pip install mpremote
./tools/deploy.sh /dev/ttyACM0
The deployment uploads the DFRobot screen driver and project modules, joins Wi-Fi and installs the pinned MicroPython client on the board. Reset the controller after a successful upload. It should set its clock with NTP, draw the six-segment control face and show READY in the centre.
6. Test the complete path
- Confirm the Pi service is running and has network access.
- Tap FEED once on the controller.
- Check that the selected label briefly inverts and the hub reports FEED queued.
- Run
meowagotchi statuson the Pi and confirm that hunger improved. - Watch
journalctl -u meowagotchi -fif the action does not appear.
The remote deliberately ignores repeated taps within 450 milliseconds and emits one action when a finger is held down. The centre and the area outside the wheel are dead zones.
Optional: add shake-to-play
Wire an I2C LIS3DH to suitable GPIO pins on the DFR1221, then extend the controller’s .env:
SHAKE_ENABLED=true
IMU_SDA_PIN=YOUR_SDA_GPIO
IMU_SCL_PIN=YOUR_SCL_GPIOCode language: JavaScript (javascript)
Deploy again after changing settings. A qualifying shake queues play and highlights the PLAY segment. The settings generator rejects shake mode if either pin is missing.
Troubleshooting
- No e-paper output: confirm SPI is enabled, the service user can access SPI and GPIO, and
panelmatches the exact Waveshare model and revision. - The cat is upside down: set
rotate = 180in/opt/meowagotchi/config.toml, then restart the service. - The remote says offline: recheck Wi-Fi credentials, signal and NTP access.
- The remote says API 401: replace the app key and confirm it has access to the private
meowagotchiapp. - A tap queues but nothing changes: confirm the Pi has the same app credentials and inspect its systemd journal for action-polling errors.
- The board has no display or touch after flashing: confirm you used DFRobot’s DFR1221 firmware and uploaded its matching
screen.py, not generic ESP32-S3 firmware.
Credential and device safety
- Keep the platform token on the provisioning workstation only.
- Use an app-scoped key with access limited to the private Meowagotchi app on devices.
- Never commit either repository’s
.envfile or generated controller settings. - Disconnect power before changing panel or accelerometer wiring.
- Stop the display service before manually running a command that drives the e-paper panel.
Project source and next steps
- Raspberry Pi pet, e-paper renderer and backend integration
- ESP32-S3 touchscreen remote, firmware tools and hardware tests
- Pi Meowagotchi project overview
Start with the Pi and local CLI, then add the private backend and touchscreen only after the cat is stable. That keeps display, connectivity and controller problems separate while you build. Before leaving either device running unattended, review the production checklist.